Home AboutMe Crafts Food

Tuesday, January 29, 2013

Fruit Basket Organization

I started off this year with lots of good intentions {aka New Years Resolutions}. I wanted to get my house organized, and I wanted myself and my family to start eating more healthy foods. It can sometimes be really easy to plan these kind of things...but the follow through is often really difficult! One of the first places that I wanted to start my organizing was the kitchen, specifically our fruit bowl! For years we kept a medium sized bowl on our counter where all of our various fruits mingled together. The bowl worked pretty good for the first few years when the boys were really little and it was mostly Jason and I eating fruit {other than the enormous amount of bananas that the boys ate when they were babies}. But as the boys got bigger they started eating WAY more fruit which meant our fruit supply started to outgrow the bowl. Plus Jason hated that the bowl took up half of the island, and I hated that when the bananas and apples hung out together the bananas always got brown faster!
I considered a few different ways to organize our fruit. I had seen a cute under cabinet storage idea on Pinterest, and I even thought about those retro hanging wire fruit baskets. But neither of those really worked with our space. I came across these baskets one day as I was browsing the aisles of Target, and I knew they would be perfect for holding our fruit!
I picked up three baskets, brought them home, and got Jason to figure out a way to hang them on the side of the cabinet {these are actually meant to be stacked up, but they work perfectly hanging too as long as you can rig up a way for them to hang because they don't come with hanging hardware}. I love that I took a basically wasted space and added storage to it. Our fruit baskets also look great right across from the boys Magnet Board that I added to the end of one of our cabinets a few years ago too.

So far the new baskets are working perfectly! Our counter tops are clear of fruit {though I can't say the same about dirty dishes and various papers}, and the different fruits don't have to mingle and make each other go bad too soon! 
Pin It!

Friday, January 25, 2013

Pallet Chicken Coop: Part One

For about a year Jason and I have been talking about getting chickens. With a house full of growing boys, we needed to find some easy ways to cut down on our grocery bill. A garden is on our list of to do's for this spring, and I figured if we were going to be farmers we might as well add a little livestock into the mix too! I did a lot of research online, and I feel in love with the idea of a pallet chicken coop. One because pallets make the cutest stuff....and two because pallets are free which means our project would be way cheaper than if we bought all new supplies at the hardware store.
We started our adventure with a trip to the Habitat for Humanity ReStore. Our original intention in going to the ReStore was to look for electrical fixtures and old kitchen cabinet doors. I had seen a suggestion online to use glass front cabinet doors as window for the coop, and I figured the ReStore was the best place to look for something like that. We ended up with a couple of glass front kitchen cabinet doors and a truck load of FREE pallets! Jason picked up some extra lumber at the hardware store and then we headed home to start building.
We decided on a layout and measured how big the base for the coop needed to be. Jason started the base with four 4X4 posts for the corners. Then he attached them together with 2X6's to make a rectangle.
 We used some scrap plywood from another project as the floor...and we got a little help from the kiddos!
 After the base was made, Jason dug holes for the four posts to sit in. We picked up the base and sat it down into the holes, and then let the kids fill in the holes with the extra dirt.
 The next step was to build the walls. Our coop ended up being three pallets across. Jason just laid them down and attached the three pallets together with extra wood strips from other pallets.
 We had plenty of pallets, so some of them {the ones with broken slates or missing nails} got used for parts.
The design we decided on was a back wall that was one pallet high and a front wall that was one and a half pallets high. After we had the front wall put together, the top edge of the pallets were trimmed so that they could be stacked.

 After the walls were trimmed, we put the walls into place and attached them to the base with lots and lots of nails. Here is a picture of the back wall in place:
 It turns out that pallet wood is actually really good quality...which means it is HARD! Which means you need a lot of muscle and a little bit of patience to get nails to actually go into the wood! We had quite a few bent nails laying around during this project:)
 And here is a picture with the partial front wall in place:
 Here is a side view of the coop with the base and walls up:
Check back next week for part two...we get the rest of the walls up, add doors and nesting boxes, and I paint the whole thing!

Linking up here..
Pin It!

Friday, January 18, 2013

100th Day of School Cake: Step by Step

My kiddos have been in school for 100 days! And Grant's school is having a whole day to celebrate, including a short party where parents get to come and celebrate 100 days with them. I made this exact same cake last year for Grant's class, and I'm making it again this year...because when something is this cute you just don't change it up:) Last year when I made the cake, I didn't take the time to do a step by step tutorial mostly because I wasn't sure how it would turn out...so this time I tried to get a couple pictures of the process so I could walk you through how to make this cute 100th Day of School Cake!
First gather your supplies. You will need two cake mixes, two cans of icing, two bags of M&M's, two round cake pans, and one rectangular cake pan.
Mix up the cake mixes according to the directions. Split one of the cake mixes evenly between the two round cake pans, and put the all of the other cake mix into the rectangular pan. Make sure to spray the pans liberally with cooking spray so they don't stick! Bake and cool slightly.
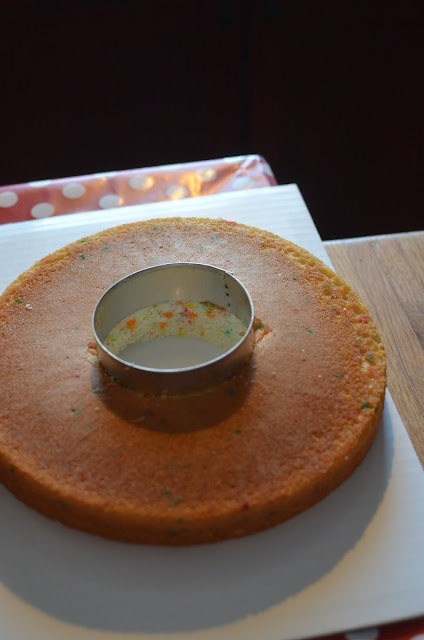
Use a circle cookie cutter to cut the center out of both of the round cakes. To cut the rectangular cake to shape, I just lined it up next to the round cakes and made it look as close to a one as possible {sorry I forgot to get a picture of that}. After all three cakes are cut, place them in the freezer for at least an hour. The cut edges are hard to ice, and freezing them makes it so much easier.
Take the cakes out of the freezer and crumb coat them with a thin layer of icing. I do this mostly because all those cut edges make lots and lots of crumbs, and I am terrible at icing cakes...and I can't stand crumbs in the icing!
Stick the cakes back in the freezer for about an hour so that the crumb coat of icing can set. Then get busy covering the whole cake with a lovely layer of icing.
Now it's time for the decorating! I poured my M&M's into a bowl to make it easier to find the colors that I needed. I put the M&M's around the top and bottom edge of all three cakes.
I followed a pattern with my M&M's, but you can just put them on randomly...or let the kids help by putting them on. I let my OCD take over a little bit and I put them on in order of the rainbow: red, orange, yellow, green, blue, brown.And yes I know that brown isn't in the rainbow, but I let it take the place of purple since there aren't purple M&M's.
When it's all decorated with those pretty M&M's you don't really notice the imperfect icing or the wonky number one! And the kiddos for sure won't notice that everything isn't perfect, so have fun with it and make a cute cake to celebrate 100 days of school with your kiddos this year!
Pin It!

Thursday, January 17, 2013

Super Easy 100th Day of School Snack

My boys' 100th day of school is tomorrow! Seriously how has it already been 100 days. It seems like we were just taking our 1st day of school pictures! Anyway, last year I made THIS super cute 100th Day of School Cake for Grant's class...and I'm actually making it for his class again this year. So I kind of started feeling bad that I'm making something for Grant's class two years in a row and I hadn't made anything for Henry's class. So even though Henry's school doesn't do a big party like Grant's {I guess 2nd grade is the cutoff for really celebrating 100 days}, I decided I still wanted to send a fun treat with him to school tomorrow.
I stopped by the store on the way home from dropping Eli off at preschool, and I browsed up and down the aisles looking for inspiration. I knew donuts would be perfect for the zeros, but I wasn't quite sure what to do about the ones...and then I saw Swiss Rolls on sale! I got home and got busy making these SUPER Easy 100th Day of School Snack...and it literally took me less than 30 minutes to put together enough for Henry's whole class!
I started with chocolate covered donuts, Swiss Rolls, and wooden skewers that I cut in half. You need half a Swiss Roll for every two donuts to make one 100. So to make 24 100's you will need two boxes of the chocolate covered donuts and one box of Swiss Rolls.
Start by cutting you Swiss Rolls in half...
...then lay out two donuts beside the cut Swiss Rolls to make a 100.
Starting with the donuts first {because they are a little more firm and won't squish}, slide all three pieces onto the skewer.
Repeat as many times as kids in the class, and then load them up on a cute platter.
I think these snacks turned out SUPER cute and the best part is how easy they were to make!
Linking up here..


Pin It!

Tuesday, January 15, 2013

Project Chicken Coop: Pinterest Inspiration

The week between Christmas and New Years at our house was spent working on a fun outdoor project: a chicken coop. We made quite a lot of progress during that time and I have a lot of pictures to share with you. But before I show you what we came up with, I thought it would be fun to share some of the inspiration that I found on Pinterest. It still amazes me how much stuff there is on Pinterest!


Pin It!

Thursday, January 10, 2013

10 on 10

 9:00 am: At the track getting in a little walk/jog.
10:00 am: Putting dinner in the crock pot.
11:00 am: Doing a little research for a ski trip we may take in a few weeks.
12:00 pm: Orange for a snack.
1:00 pm: Picking up Eli from Preschool
 2:00 pm: My day just isn't complete without doing a little bit of laundry!
 3:00 pm: Raining while we wait in the school pick up line.
4:00 pm: Boys playing with Play-Doh.
5:00 pm: Looking over Henry and Grant's report cards. They both got all A's!
 6:00 pm: Dinner is served.

Pin It!
Related Posts Plugin for WordPress, Blogger...