Home AboutMe Crafts Food
Showing posts with label Recycling. Show all posts

Friday, December 14, 2012

Pallet and Hay Christmas Display

I never thought that back in August when I asked Jason to bring an old pallet home from work, that I would still be using it in December! That one pallet has gone from Barynyard Party to Fall Display to Christmas picture backdrop, and now I'm using it in my Pallet and Hay Christmas Display! It has been one of the most versatile outdoor decorations I've every had...and it was basically free except for the embellishments that I added to it! 


To dress the pallet up for Christmas, I turned it 180 degree so that the fall saying was at the bottom {that way I can use it again next year}. Then I added a Christmas Bible verse to the top with some vinyl that I cut with my Silhouette. I would recommend using outdoor vinyl, but if you don't have any {like I didn't} you can use regular vinyl and then spray a really good coating of clear sealer over the letters after you stick them to the pallet. At night our Mary, Joseph, and Baby Jesus light up, so I kind of want to add a light up star to the display somehow but I haven't quite figured it out yet!

Linking up here..
Pin It!

Thursday, September 15, 2011

Football Windsocks

Early this week, I confessed that my front porch was still decked out with patriotic decor even though we are halfway through September. So yesterday I got busy making my porch a little more festive for football season instead of the 4th of July! I knew that I loved the look of my Tin Can Windsocks, and I wanted to put something up in their place...and what could be better than some windsocks made to look like FOOTBALLS!
I started with the same supplies as my 4th of July version: old formula cans, spray paint, ribbon, white contact paper, and twine. I cleaned out the cans, dried them really well, and then sprayed them with a good coat of brown spray paint.
After the paint dried, I brought them inside to decorate with white contact paper. I cut one inch wide strips of contact paper long enough to go all the way down the side of the can. Then I cut 3/4 inch strips that were about 3 inches long to make the cross stitches. I used 2 of the longer pieces and 6 of the shorter pieces per can so that I had a "football" on two sides of the can.
This is where this project gets really fun, because now you can personalize them to show your team spirit! I used maroon and white ribbon because we spend most of the year cheering for the Mississippi State University Bulldogs...plus the boys' school colors are maroon and white too! I think these would be really cute with almost any team color combo...blue and orange for Auburn, purple and gold for LSU...whatever team you cheer for! I cut my ribbon into 12 inch lengths and then hot glued them inside the can alternating the two colors.
After you add your ribbon, make two holes in the top of the can with a screwdriver and hammer. Then feed your twine through to make a hanger for your windsock.
Hang your Football Windsocks proudly on your front porch and then get ready to cheer on your favorite team!
How do you decorate for {or celebrate} football season?

Photobucket"
Pin It!

Thursday, May 19, 2011

Sidewalk Chalk Paint!

This SUPER fun project {Sidewalk Chalk Paint}was orginally posted over at Postively Splendid as part of Amy's Summer Survival Guide. I am reposting just in case you missed it, but please go over and check out all the other awesome summer ideas that have been {and will be} posted throughout the month of May!
Positively Splendid


We love regular chalk at our house. It's relatively cheap, not too messy, and it is the perfect outdoor activity! Basically the kids love chalk because it's fun and I love chalk because they are making a mess outside and not inside:) What I don't love about chalk are all the little broken pieces that pile up after a few weeks of use. I hate to throw them away, but they are just too small to use without scraping your fingers on the concrete!
Instead of throwing them out, we are going to turn those broken piece of chalk into paint! Start by sorting your chalk by color. This is a great teaching activity for any kiddo who is working on learning their colors.
Put each individual color into a zippered bag.
Seal up the bag and then break up the chalk using a small hammer. This should be done by an adult or a {very} well supervised child. Try and break the chalk into a fine powder to make you paint as smooth as possible.
One you have your powdered chalk, pour each color into small plastic cups.
Add a little water.
And stir around with a paint brush to dissolve the chalk powder. We used some inexpensive art brushes that are now our chalk paint brushes:) All of the chalk powder may not dissolve, but your paint should still work fine. Use a different brush for each color and then let the kiddos get busy making art on your sidewalk. The colors may be hard to see at first, but as soon as they start to dry the individual colors will show up well!

The best part about chalk paint is that if someones spills it, it isn't a big deal because all you need is a water hose to clean up the mess!
And that is how you turn broken chalk pieces into a ton of summer fun!
Visit thecsiproject.com
Pin It!

Thursday, April 21, 2011

Pen and Pencil Caddy: Kids Recycling Project

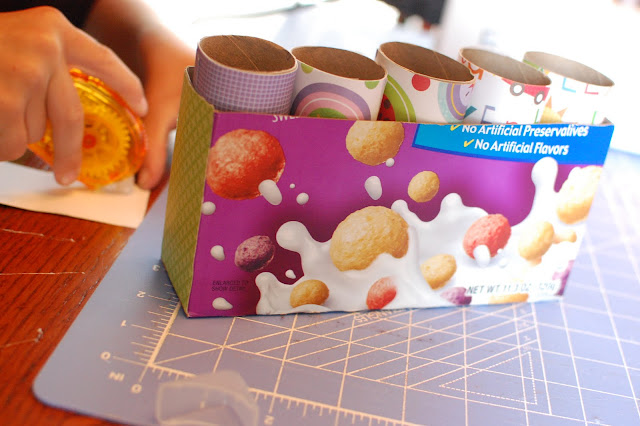
In celebration of Earth Day tomorrow, Henry had to make a recycling project for school. We thought of a bunch of ideas from a soda bottle bird feeder to a fold up race track made from a big box, but in the end we made a cute Pen and Pencil caddy out of an old cereal box and some toilet paper tubes.
 We started by cutting the bottom of the cereal box off just a little bit shorter than the toilet paper tubes. Then Henry got busy measuring, cutting, and then gluing decorative paper to the box and 5 toilet paper tubes.
 I used an X-acto knife to straighten up the top edge of the box.
 When all of the toilet paper tubes were covered, we placed them inside the box.
 I printed out a Pens & Pencils label for the front just to make sure his teacher knew what he had made:)
 And that is how you make a really cute, easy, and RECYCLED Pen and Pencil Caddy!
Have you recycled anything today?
{For more fun Earth Day ideas, check out this fun post from last year when we made upcycled sand toys!}
What kind of fun treats are you making for your kiddos this summer?
Visit thecsiproject.com
Pin It!
Related Posts Plugin for WordPress, Blogger...