Home AboutMe Crafts Food

Tuesday, May 17, 2011

Cookie Palm Trees

Summer is right around the corner and the cookies I am sharing with you today are perfect for all of those end of school/luau/beach/pool parties that everyone is sure to be having soon!
The beauty of these cookies is that you only need two ingredients. Pirouette cookies and green fruit slices...plus a few tooth picks to hold them together.
Using a very sharp knife, cut each fruit slice into three pieces as shown below.
Arrange three slices in a palm tree pattern making sure to overlap the top edge of each fruit slice. Push a toothpick into the fruit slices and be careful that you catch all three of the pieces with the toothpick.
Place the palm leaves {with toothpick attached} on top of the pirouette cookie and push the toothpick into the the fudgy inside of the cookie.
I added these Cookie Palm Trees to a Jello Island for Grant's Luau Party at school, but these Cookie Palm Trees would be really adorable on top of a cake or even cupcakes too!
I'm still trying to think of a way to display these without sticking them in another snack {because they are just that cute on their own}, so if anyone has suggestions I would love to hear them:)
Pin It!

Monday, May 16, 2011

Miscellany Monday

1. I have been doing the Couch to 5K program for the last couple of weeks with a few of my friends. We started out barely able to jog the 90 seconds and today we jogged for 20 minutes without stopping! It is hard for me to believe that we made it this far in just 6-7 weeks. I'm not sure how far we jogged because we are slow we have been more focused on time instead of distance...but I'm thinking we did around a mile and a half today!

2. Friday is the boys' last day of school and I don't know if I'm excited or nervous! Summer means entertaining 3 SUPER energetic boys all day long! Thank goodness my mom has a pool:)

3. Eli has decided that it is fun to ride his tricycle in the house. So now every time I turn around he is dragging it in the back door to ride. I would have never let Henry or Grant ride their tricycles in the house...I think I'm slacking with the third one!

4. Today I am sharing a fun spray paint tutorial at 3 Sun Kissed Boys. Go over and check it out, leave some comment love, and also check out all the awesomeness that is Yanet's blog too!

5. The rest of my week is going to be filled with making end of the year teachers gifts and working on scrapbooks for all 27 kids in Grant's class! I am totally not a scrapbooker, so I've been putting it off for a while but now that we only have 4 more days of school I have got to get  busy. Procrastination at it's finest I guess!

6. Don't forget about the Thank You Cards Shop giveaway that ends tonight! The winners {there are two} gets to pick 10 free cards of their choice...and let me just say the choices are all SUPER cute!

Miscellany Monday @ lowercase letters
Pin It!

Friday, May 13, 2011

Wooden Cross Redo & a Spray Painting Tip

I bought this gorgeous handmade wooden and metal cross last year at an arts and crafts festival. At 6:00 am in the morning under very dim light, the color on it looked like a perfect match for my bedroom. Unfortunately when I got home the color just wasn't right...but I didn't know for sure what I wanted to do about it. Last month when I decided to start redecorating my master bedroom {remember I added black, white, and red into my turquoise room}, I knew the the best solution for the cross was a coat of red spray paint.
 After I spent more than a few minutes trying to cover the white cross with painters tape, my genuis husband shared with  me that he thought the pieces would all come apart. And they did! So I pulled off all the painters tape and got ready to spray paint just the blue cross!
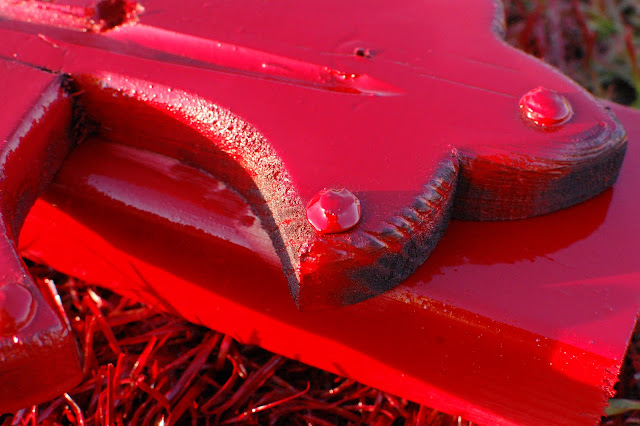
 Now the only problem was the metal nail heads on the blue cross, which I definetly didn't want to paint over. Again Jason came to the rescue with an idea. Apparently you can cover anything metal with Vaseline before you spray paint and that will prevent the spray paint from getting on it...and to remove it all you do is wipe it off after the paint has dried! Genius idea right!?!
 So I used a Q-tip and carefully applied Vaseline to all the nail heads being careful not to get it on the cross.
 I sprayed the cross down with a liberal coat of Krylon Cherry Red spray paint. Check out how the paint just sat on top of the Vaseline coated nail heads!
 After the paint dried for about 30 minutes I simply used a paper towel and wiped the now red Vaseline off of the nail heads. Seriously check out how well that little spray paint tip worked!
 Here is how the {reassembled} newly painted cross looks against the turquoise walls in my bedroom...not too bad! Now I just have to decide exactly where I want to hang it:)
I have another fun spray paint project that I am sharing as a guest post next week too!
Have you done any spray painting lately?!?
Pin It!
Related Posts Plugin for WordPress, Blogger...